Homemade Christmas - Sets of Cards

A weird idea I got for homemade Christmas was to make a box of cards for people to use. There were days I thought this was going to be a great idea ("handmade stationary for many occasions!"), and other days I thought it was really dumb ("who would want a card that I made to give to someone else?").  I landed on "OK, some people might actually like that" and gave boxes of handmade cards to people.  Who knows they might all end up in the trash without being sent.  LOL. 

Really, I love making cards so much and I don't have enough people or occasions to feed my need.  Ha!   So here we go:

 A-2.  I love this card.  Card stock base is a Recollections prefolded card and envelope in craft paper. "Hello" is red vinyl with a gold shimmer DCWV offset. The background paper is some random script printed paper from a 12x12 book (don't remember the brand).  Washi tape embellish layered with a strip of white vellum.  

A-2.  This was an exercise in patience. The base is a grey linen from a set of pre-folded A-2 cards, and the background is actually another card from the set that I deconstructed because the greys matched. The typewriter is sketch pen on the SIL (the black shimmer pen) and the design was originally from the SIL store. I did this sketch on an off-white cardstock - several of them did not turn out on the SIL because the ink would 'skip' occasionally which is incredibly annoying.  I ended up with only 4 I could use, so it was worth it. The little typewriter design is amazing. The offset is black card stock. 

Small Cards - Several Designs -  Same Paper, some stamps and string!  

These were all inspired by some crazy lined, glitter pattern paper from a 12x12 book I grabbed at Michaels on sale (are we sensing a theme here?). I matched up yellow and pink card stock and  measured and cut out 2x3 folded cards and kept on trucking from there. You'll note on this one I punched out an ampersand and embroidered it in blue. 
 Each card was a little different - I used various sentiments like "hello", "thanks" and "congrats".
 A few of these were embroidered and others were just tied with baking twine. 
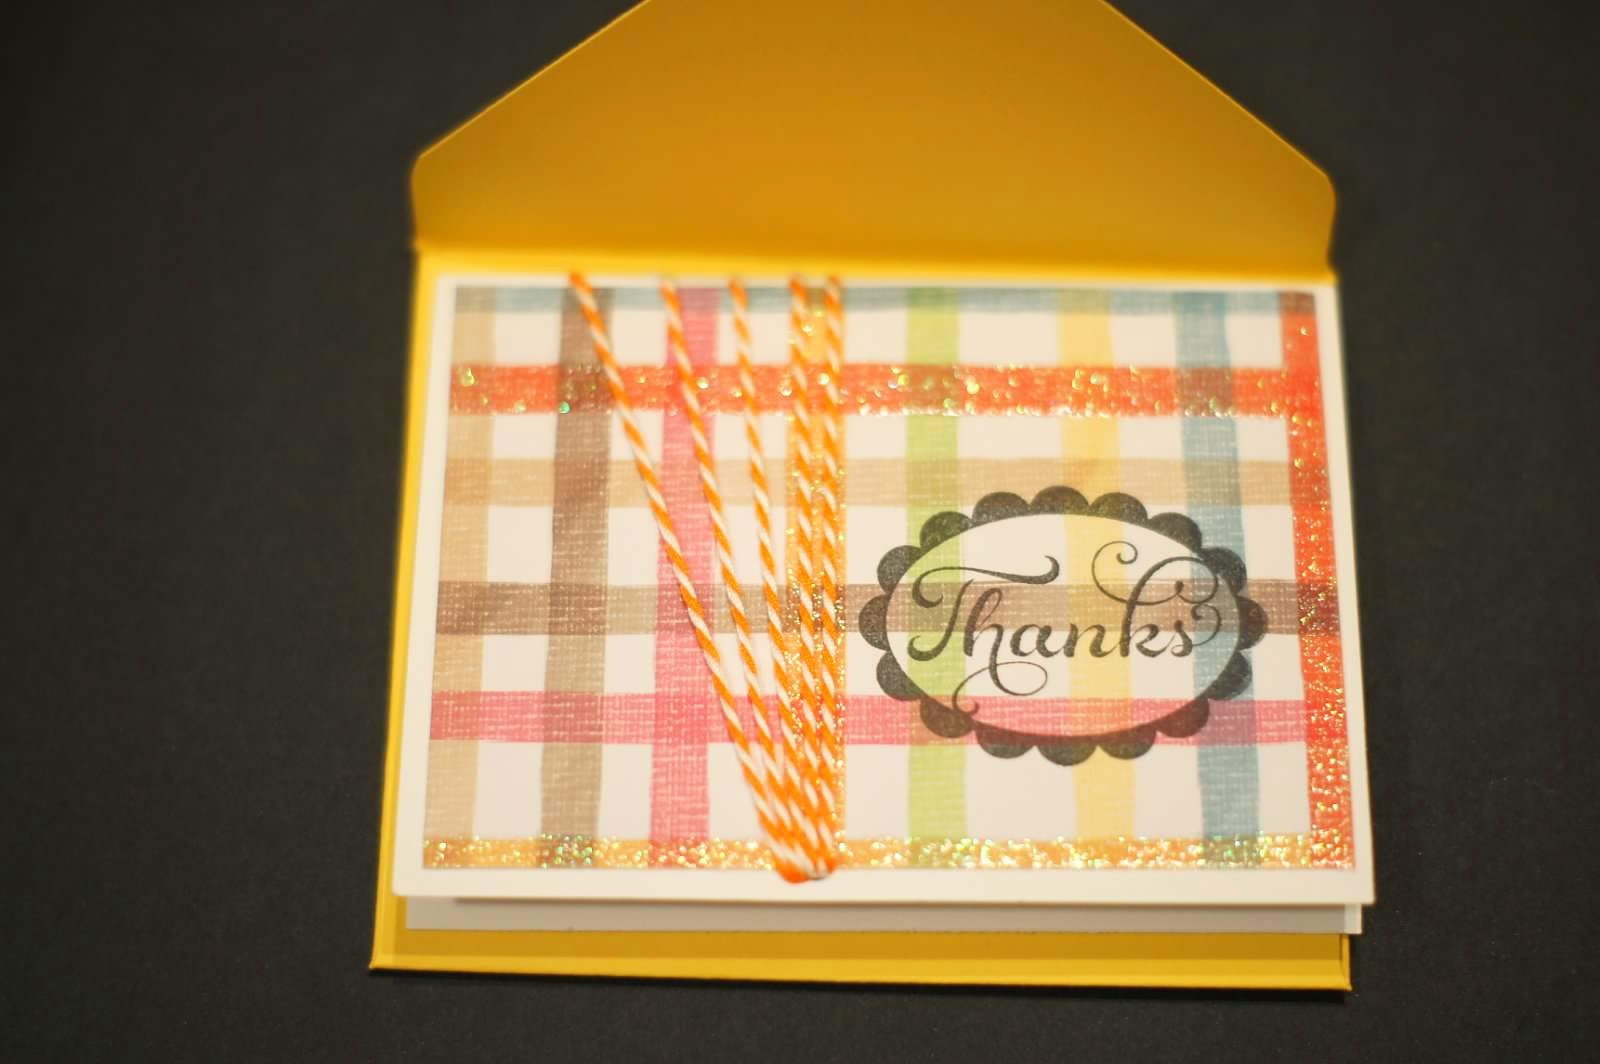
I then made envelopes for all of the cards with the WRMK envelope punch board.  My preferred glue for envelopes that are made with card stock is SU fast fuse. It works instantly and holds the extra weight of the 65 lb stock.

What is the good of being crafty if you cannot do nerdy things?  One of my gift recipients and I have a running joke that we exchange David Bowie themed gifts. It has taken some really funny turns.  Here is a card box I made with white vinyl:  
Yes, this was as hard as it looks.  Days on the design and high blood pressure getting the vinyl to cut correctly.  WORTH IT.

And here is an adorable Labyrinth themed card:
A-2.  This is a brown linen-style card stock base. The lettering is black vinyl with a white card stock offset that I created after cutting the vinyl.  The shimmery blue is DCWV and it is embossed with a cool folder received as a gift that is neither Sizzix or Darice (cannot remember the brand!).  The labyrinth worm was printed and cut out with scissors, along with the blue offset. 

Finally, for good measure because I thought the recipient would like some additional nerdiness, a JRRT card centered around JRRT's original Smaug drawing. 5x7 postcard in black.  Smaug in black vinyl with a white card stock offset.  Gold text frame and tea-stained sentiment.


Lessons in Layers

DIY: Custom Wall Art

Yeah, just take that in for a second.  This was an exercise in layers and patience.  In order, it is 2-3 layers of off-white acrylic paint, vinyl "ENGLISH", a thin layer of Modge Podge (matte), then 2-3 layers of tan acrylic paint. After it fully dried, I removed the "ENGLISH" vinyl, then added a healthy layer of Modge Podge.  The Modge Podge makes an excellent base for the final layer of red vinyl, which will not be removed.  The ENGLISH is a modified Garamond font (I think) and the blessing is Channel from DaFonts.

I was really pleased with how this turned out.  I found that Modge Podge helps with adhering vinyl to canvas because it makes the canvas less 'bumpy'.  It made a wonderful custom gift! 

Homemade Christmas - Heat Transfer Vinyl

DIY: Heat Transfer Vinyl

This is pretty straightforward - there are only a few tricky things to keep straight.  First, the design is all that really matters (and remembering to reverse the image before cutting!). I spent most of the time tracing, moving lines, and selecting fonts and sizes.  Another tricky piece is to remember how to load the HTV into the SIL - I get this wrong from time to time.  HTV (even the SIL brand) is fun to work with - it has a removable layer that also acts as a heat-barrier during ironing, it cuts beautifully and weeds really well.

The tigerhawk I always slap down to use up extra space of the HTV. 
This next design took forever!  I don't know much about cars (especially old ones) so looked at several pictures of old Hudson Hornets and picked out design elements that make the car identifiable.  I then found an old time car silhouette and modified it heavily.  The recipients were happy with how it turned out.  They said it was recognizable - so mission accomplished! 
 Heavily stylized Jake the dog in a 'pocket'.  Yellow HTV and black HTV.
Great use of a pocket T from Children's Place.  I thought the dino stored in the pocket was pretty cute. 

The last trick is to apply lots and lots and lots of pressure when ironing the HTV.  Think of it this way, the professionals use similar HTV and rely on a precisely heated press to fuse together the shirt and material. These heat presses have at least two adjustments: heat and pressure (lbs of force placed on the material and shirt).  So, for the home DIY, you have to put a LOT of downward pressure on your iron in order to make it work correctly.  This means getting up high and having a solid surface on which to put the downward force.  I literally take the pad off my ironing board and place it directly on the counter top (linoleum), kneel on my chair, and put as much weight on the iron as I can tolerate.  You don't need to shimmy around the iron much, especially if your design is smaller than the iron surface. Cotton Heat + Maximum Pressure!  That is the mantra. 

Homemade Christmas - Screened T-Shirts

DIY: Screen Print

Exact same process as the dump truck project here.  What I learned this time: Need a bigger screen for adult t-shirts.  I was able to fit entire vinyl project on the screen, but trying to squeegee the top, bottom and side was difficult because it was hard to maintain the angle and pressure.  Also, a cardboard backing under the shirt totally backfired on this - there ended up being paint grooves from where the pressure was uneven due to the corrugation.  I'll use wood or masonite in the future. The t-shirt brand took the paint really well - this is "urban" brand from Kohls.  It was inexpensive and pre-shrunk.  I had a lot of fun designing this one - the font is from DaFonts and I found an image and created basically a vector art outline of the main identifiable components, traced that, then fiddled with it (all in SIL). 

Fixing a Hole in the Ocean

DIY: Etched Glass

Several of my homemade gifts for the holiday were a glass product etched with Armour Etch.  I used normal white contact paper as the vinyl stencil.  All designs were made on the SIL and the images were reversed in the case where it was etched on the back of the product (plate and bowl). I also put rectangles around the designs to help me mark out the areas that would have the vinyl removed.

I cleaned the glass surface and rubbed with alcohol to assure all impurities were removed.  I used transfer tape to place the design on the glass and assured that the vinyl had no bubbles.

I masked the other areas with leftover vinyl and painter's tape.

The method that I've perfected gets a very good, deep etch.  I learned that applying with a multipurpose paint brush works great and gives maximum flexibility.  I brush on the white Armour Etch cream and go over the design in different directions for a few minutes.  I then leave the cream on the design for another few minutes.  The white Armour Etch cream is about the consistency of pudding - it will run, but more or less stays in one place.  Using the brush I return as much of the cream back into the bottle then run a gentle stream of water over the design - always using the brush to carefully and gently wash away the excess cream. The masked down stencil probably won't move, but I don't want to risk accidentally pulling up or wiping up a corner. 

After the design dries, I repeat the process a second time for a very deep etch.  After rinsing the second time, I remove all the tape and vinyl and voila!  It's done.

I found that photographing these are HARD!!

I thought the unicorn silhouette here was funny and oddly majestic (which makes it more funny).  This is on a pilsner pub beer glass.   


Ok, so I explained the process above and admit this was one of my first projects.  It didn't turn out as smooth.  There are a lot of swirls in the open portions.  Had I been more diligent it would have turned out better.   The design is applied to the back of the plate so the eating/serving surface is not disturbed.

This is an old flower vase - a great upcyle project.  "Sure do" is a family saying of ours and we put it on everything!  This ended up being a 'white elephant' gift swap item.  I was relieved to get rid of another vase (why do I have so many vases?!?!?!).

 I made salsa dishes as a gift.  These turned out GREAT.  There is a matching set of "hot" and "less hot" -- because these people do not make mild salsa!!

This is a close up of one of the peppers on the jar. All designs are applied to the 'bottom' or 'outside' of the bowls.  Therefore the food wouldn't be touching the etched portion.  (I don't know if it is safe to have the food touch the etched space - the etch material is long gone - but I just wonder whether it is more difficult to clean - so I've always etched the part that doesn't touch the food). 

 Two more beer glasses.  Totoro and Yoda.


Toe in the Water - Paper Pumpkin

I was encouraged to try Paper Pumpkin when there was a discount offered in the fall of 2014.  It is a subscription program offered by Stampin' Up where you get this adorable box sent once a month and there is a craft to do.  Normally it is themed for the next month's holiday.  It comes with an acrylic set of stamps and an ink spot, and everything you need (even adhesives!) to do the project in the box. It's totally fun. 

Here was the first box - the 2014 September Paper Pumpkin.  The welcome card and packaging were just too cute.  Also, in everyone's "first" paper pumpkin, there is a small acrylic block so you can use the stamps in the set and in later kits. 

Here are the contents of the September Paper Pumpkin (2014).  I didn't unwrap the packaged craft before taking the photo.  This one contained burlap treat bags (pre-stamped with the black lines and dots) and a number of cards and offsets on which to make Halloween themed tags.  It also came with tiny black stickers. The genius of this set is that the acrylic stamps included the shapes of the stickers.  Not to stamp on the stickers, but to use the same theme embellishments after the stickers are gone. I love that added touch - so the sets inspire you for this project, and you can use them forever!  The Ink Dot here is an orange color (Tangelo Tango).  

The October Paper Pumpkin was Thanksgiving theme.  The stamps are great for thanksgiving - but also the "Thankful for You" is obviously applicable year-round!  The Ink Dot is an olive green color.  

The November Paper Pumpkin was a fabulous holiday card and gift tag set, themed with snowflakes.  I had SO much fun with the set that I forgot to even take a photo of the box!! I tore into it immediately.  The Ink Dot was Lost Lagoon - a sort of green-blue color. One thing I learned from the holiday themed set is that a green-blue color stamps beautifully on light blue paper.  Which really encouraged me to start stamping on paper that is not white or cream.  I've been experimenting lately! 

So This is (Homemade) Christmas

 I endeavored to make hand-made gifts for everyone during the 2014 holiday season.

DIY Canvas Art:  This was an early one I finished, testing some canvas painting techniques.  Sorry the photo quality isn't great.


This is done with a method I've heard referred to as "pvpp" or paint, vinyl, paint, peel.  I'll explain how I did it -- because there are some intentional tricks I use to get this to work better and prevent bleeding. 

The concept is simple, but a little boggling until you do it a few times. I still have to really visualize how to get these things completed before I start even designing the canvas.

What is important to keep in mind is the basic difference between a stencil and a mask.  The terms are sometimes used interchangeably - but they are different.  A stencil is a material that has space removed to reveal the design, and the stencil is placed onto another material with the goal of putting paint (spray, sponge, etc.) in the negative area of the stencil.  When the stencil is removed, the paint will only be in the negative space, thus creating a painted design.  A mask is, in some ways, a reverse to a stencil.  A mask is a material that makes up a design and is placed over existing painted material to protect it, then new paint goes over the project including the mask.  The mask, when removed, reveals the protected area of original paint making up the design.

This canvas was created using a mask.  The canvas is 12x12 stretched on a frame.  I designed the birds and words "sure do" in the SIL and cut it out of inexpensive adhesive vinyl material - some awful wood colored ConTact paper.  I weeded out the space that wasn't birds, lines and letters (so a lot of waste, which is why I use cheap ConTact paper).  I then covered the image with transfer material.  Here, I wanted blue birds and letters, so I painted the canvas in the blue color (a few coats).  After it dried fully, I worked on lining up and transferring the vinyl design.  This took a lot of effort and patience for two reasons - first, it needed to be straight and centered.  To help with this, I added dots to the design before cutting by using the SIL software. The dots were placed in the true center of all 4 sides and one in the direct middle of the project.  Mercifully none of the dots interfered with the design.  Using those guides, I measured out the center of the canvas and the center of all 4 12" sides and tried like heck to line everything up.  I kept measurements on blue painters tape affixed to the canvas so I didn't have to worry about covering up marks later.  Once I had it lined up, I used painters tape to tape one strip across the entire vinyl project (underside, vinyl & transfer tape) so I didn't risk it shifting while removing the underside.  I then used a hinge method - pulling up one side of the taped area - to cut away the underside (which would reveal the sticky vinyl and transfer tape).  Then I smoothed that area out and removed the painters tape and took off the underside of the other portion.

At this point there is a fundamental problem that vinyl doesn't like surfaces that aren't smooth.  Canvas fits that category.  Plus, a stretched canvas has an open back.  In order to remove the transfer tape, I had to burnish the heck out of the project.  This took some time and patience.  I burnished everything from the back, vigorously, using the SIL scraper.  I also heated it from the back with a heat gun - having read somewhere that it helps.  I burnished from the front as well, placing a hardback book under the canvas.  Slowly I was able to remove the transfer tape, leaving the bird design on the canvas, 100% bubble free.  I frequently used an x-acto knife to take off pieces of transfer tape that I had already successfully peeled up, so as to avoid those pieces becoming a sticky nuisance.

** A few notes here - the heating does work to some degree.  Also, I've tried putting down a very thin coat of modge podge and that helps smooth out the surface as well, but it is essential to get the modge podge done in a way and finish that is desired, because the mask is covering the "final" painted portion. Truthfully, most people don't use canvas because the vinyl is just finicky on that surface. 

All downhill after that step!!  The next step is that I paint over the entire canvas evenly with modge podge (matte, usually).  For some reason, this helps seal the mask so paint won't creep under it during the final steps.  ** NOTE: This has to dry COMPLETELY before moving ahead. 

I then painted several coats of the off-white color.  I realize in hindsight that a mask method works much better if the light color is the design, covered by a darker color.  The reverse means 4 coats of off-white.  I'm kind of a dummy.  My DH spotted the problem instantly as I was happily mixing and painting the blue color. 

After the whole shebang was nice and dry, I used a craft tweezers to pull up the deisgn.  In an earlier project I used my vinyl hook - but actually poked through the canvas in a few places (d'oh!).  My craft tweezers is sharp enough on the ends to get under the vinyl (that is now covered in several layers of modge and paint).  Normally no further action is required other than just peeling up the vinyl.  However, it helps to have an x-acto on hand in case the paint looks like it wants to come up too.  **This rarely happens - although it definitely did when I thought it would be cute to modge podge over the final coat of paint (rather than wait for the vinyl to come up then modge podge).** I didn't have to touch up anything because no white paint got under the vinyl. 

So there it is - a great, custom piece of artwork for my grandma.  She LOVED it so very much. 

Baby You Can Drive My Dumptruck

DIY Screenprint. 

The possible uses of vinyl are seemingly endless! Here, I used a Speedball starter kit (small screen frame, squeegee, and black paint) to create a TShirt for a toddler. The TShirt brand is Children's Place - pre-washed in a size 2T.

I designed the vinyl stencil in Silhouette Studio. The image and font (Rockbiter) is from the Silhouette store. I reversed the image and cut the file, then weeded and used transfer paper to put the vinyl on the back of the framed screen. This was one of the most difficult parts. Vinyl doesn't stick well to stretched screen, and I had to put a large hardback book under the screen to burnish it without breaking the screen from the frame. After getting the design on the frame, I masked off the blank areas around it with leftover vinyl and painters tape.

To prep the shirt, I took a sturdy piece of cardboard and sprayed it with Krylon repositionable adhesive-tack. The cardboard went into the shirt and I stretched and smoothed it flat over the sticky side of the cardboard. Then I used lots of painters tape and a marker to create a grid and guide lines (on both the shirt and the frame) for where I wanted the screen so the image would be straight. 

I tested the screen on cardboard to get a feel for how much pressure to put on the squeegee. Then I carefully carefully positioned the screen on the shirt. This is the point where if you have a helper, it is much easier  - i.e., have your helper hold down the screen so it won't move as you work. Then I took a small spoon to scoop the ink over the image to 'flood' it (this means put dollops of ink on each area of the design and smear it about with the underside of the spoon). It works best to start from the top of the image when you flood because you will then squeegee by pulling toward the bottom. Then I put the squeegee at the top of the screened image and, holding the squeegee at an angle toward me, put even pressure and pulled the squeegee toward the bottom edge of the frame. 

I left the squeegee in place and gently pulled up the frame. Cleaning the screen was then the most important task because the ink dries fast. I recovered much of the ink by scraping it back into the jar. Then rinsed the screen in warm water, using pink soap to scrub away ink and removed the vinyl. 

I let the shirt dry overnight. I didn't take it off the cardboard until the next morning. The paint must be heat set in order to stay permanent, so I ironed it the next day on a cotton setting for a few minutes.  

Toddler loves the shirt!